Inclined Plane Mezzotint - Part 1
I've taken a few weeks away from printmaking to focus on a bit of drawing, and a few other projects, but I thought I'd start updating my blog more frequently with what I'm working on in the studio. At the end of the project I'll post a YouTube video as I typically do. Leave a comment down below and let me know what you think about what I'm working on.
This print is looking at simple machines, which are: Lever, Wheel and axle, Puller, Inclined Plane (This print), Wedge, and Screw.
I have a tendency to make things more complicated than they should be, and given the space, I'll add details to no end. So part of the idea of this print of an inclined plane was to restrict it to a smaller size. By doing a print this size, I'm forced to simplify my ideas to the most basic version. Due to the matrix created by the mezzotint rocker, you can only add so much at this size.
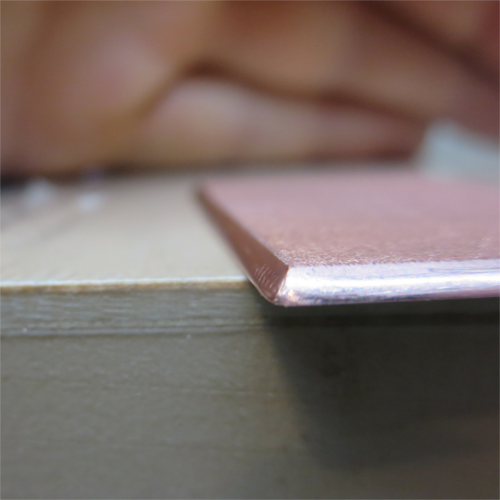
My first step is to cut down a larger plate to approximately 1" tall and 2" wide. I beveled the edges with a flat file so when I rock the plate I don't chip off any teeth from the mezzotint rocker...or at least any more teeth!

I decided to do a few thumbnail sketches, even though in my mind I knew what I was going for, but I've been trying to explore my ideas more to really help refine them. So I trace the plate onto my sketchbook and get to drawing...

A couple of quick sketches, and in typical fashion I start off adding too much detail, with extra vertical lines supporting some sort of ramp.
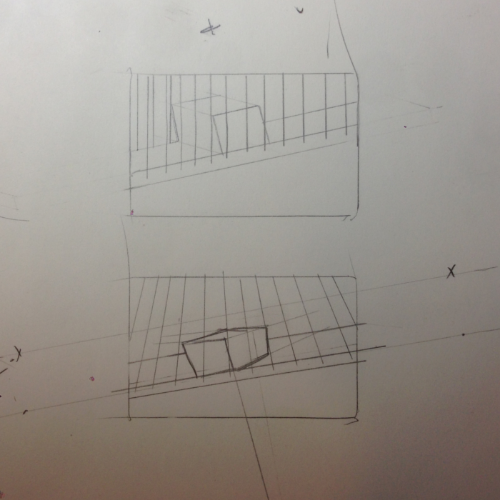
Once I simplified a bit, I settled on this as my rough sketch. I'm thinking a solid dark mezzotint on the bottom, and a gradation above the "ramp". For the actual ramp, I'm going to work with Chine-collé. If you are not familiar with that, essentially you print your copper plate (or a part of it in this case) onto a thin piece of paper, which is simultaneously glued to the main printmaking paper. So for this print, the ramp will extend beyond the limits of the copper plate.

Now that I have an idea of what I'm going to do with the plate, it's time to rock the plate. I typically use an 85-gauge rocker, which has 85 small teeth per inch (Here is a video about mezzotint rockers) However on this print, since it's so tiny, I decided to use my 100-gauge rocker, in the hopes of filling in a bit more of the plate with a tighter pattern. The disadvantage of more teeth is that they do not go as deep into the plate, so hopefully it will be dark enough when I print it.

And here is the final plate after rocking. I rotate the plate about 20-degrees after each path, and keep rocking until I rock each direction twice. You can see how dense the pattern on the plate is. I do have a few areas of plate that I will need to print with no ink/minimal plate tone, so I'll have my work cut out scraping and burnishing.
I considered trying to skip these areas as I was rocking, but since it's such a small plate, it would have been hard to not rock into those areas.

I did a bit more cleanup on the plate edges. The more time spent now means less time when printing having to scrub the edges to keep them clean. I used a large file for the bulk of the angle. then I used a small file to smooth it a bit more. Finally I used 400, 600, 1000, and eventually 4000 grit sand paper to work the edge to a nice mirror finish.
That's all for today. I'm looking forward to getting into scraping this plate. Leave any questions down below!
-G